Creating a customer in Okappy from another application
Zapier is a way to connect your apps and automate workflows. It moves information between different applications using triggers and events.
Learn more about our integration and API’s.
Automated workflows could include getting your list of jobs from Okappy and populating a Google Spreadsheet. You can also use other application to trigger the creation of a job or customer in Okappy. Read on to find out how to use an email or a Slack message to create a customer in Okappy.
Note: The Zapier integration and documentation is currently in beta. An invitation is required in order to use the Okappy app in Zapier
If you haven’t already done so, create an account in Okappy and an account in Zapier.
To create your account in Okappy, click the Try for free button at the top right of the page.
To create your account in Zapier, go to Zapier and click Sign up.
To create a customer in Okappy from an email,
- In your Zapier dashboard, click Create Zap

- Select Email by Zapier
- In the Event section, choose New inbound email and click Continue

- Create an email address in Zapier where you will send your job request emails to and then click Refresh
- Copy the address
- Click Continue
- Test the trigger by sending an email to the new address you created
- Click Test trigger
- Once the email has been received by Zapier, you will see the details of the email
- Click Continue

- In the Action tab, enter Okappy in the search field
Note: If you cannot see Okappy, contact us for an invite.
- Select Okappy Workforce Management
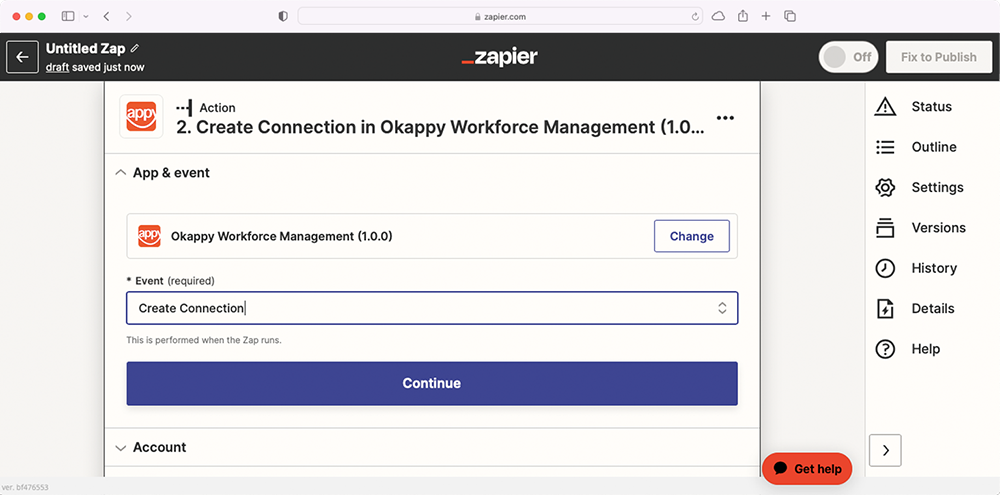
- Choose Create Connection in the Event field and click Continue
- Choose account or authorise Okappy with Zapier by Sign in
- Click Continue
- Set up the action by mapping the fields from the email into the relevant fields for your customer

- Click Continue

- Click Test action
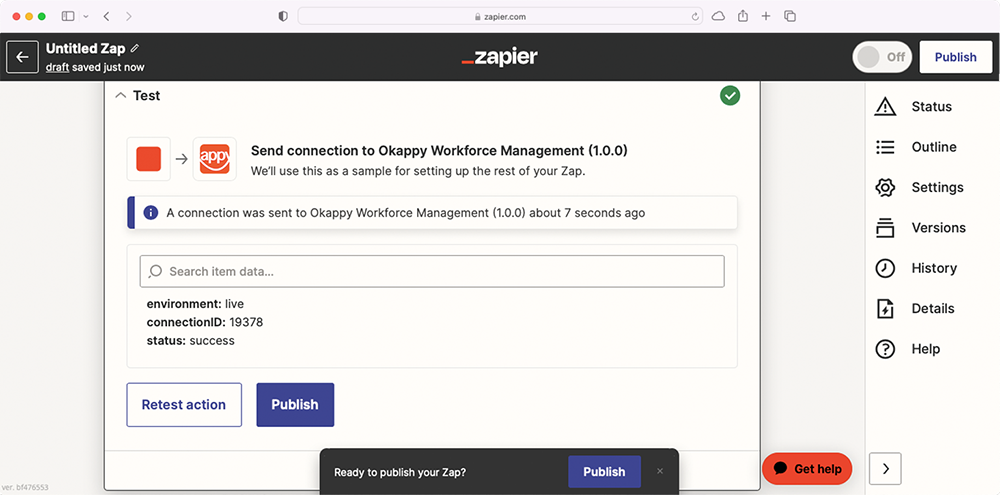
- If the zap is successful, you should see an alert saying that a Connect was sent to Okappy Workforce Management. If you log into Okappy and go to the Connections screen, you should see the new customer.
- Click Publish Zap
- Select Publish and Turn on
To create a customer in Okappy from a Slack message,
- In your Zapier dashboard, click Create Zap
- Select Slack


- In the Event section, choose an event such as New Message Posted to Channel
- Click Continue
Note: If you have not already authorised Zapier with Slack, you will need to do it now
- Choose one of your Slack channels and then click Refresh fields
- Click Continue and then Continue again
- Test the trigger by sending a message to the Slack channel you have chosen
- Click Test trigger

- Once the Slack message has been seen by Zapier, you will see an alert saying We found a message! along with details of the message
- Click Continue
- In the Action tab, enter Okappy in the search field
Note: If you cannot see Okappy, contact us for an invite.
- Select Okappy Workforce Management
- Choose Create Connection in the Event field and click Continue
- Choose account or authorise Okappy with Zapier by Sign in
- Click Continue
- Set up the action by mapping the fields from the Slack message into the relevant fields for your customer
- Click Continue
- Click Test action

- If the zap is successful, you should see an alert saying that a Connection was sent to Okappy Workforce Management. If you log into Okappy and go to the Connections screen, you should see the new customer.
- Click Publish Zap
- Select Publish and Turn on